Colour Doppler Echocardiography: Transforming Heart Health with Precision
Advances in medical imaging have empowered cardiologists to diagnose and treat heart conditions with remarkable accuracy. Among these technologies, Colour Doppler echocardiography has emerged as a cornerstone, offering real-time insights into blood flow and cardiac function. Whether you’re a healthcare professional, a medical student, or a curious reader, understanding the basics of Colour Doppler echocardiography can deepen your appreciation of this life-saving tool. This guide simplifies complex concepts and highlights the practical significance of this technology in heart health.
“Colour Doppler Echocardiography revolutionizes heart imaging, offering vivid insights into blood flow and cardiac health.”
Key Takeaways
- Visualize Blood Flow in Real-Time: Colour Doppler Echocardiography uses color coding to display blood movement within the heart and vessels.
- Non-invasive Diagnostics: This method provides accurate, real-time cardiac data without invasive procedures.
- Pinpoint heart anomalies: Detect and assess issues like valve dysfunctions or congenital defects with precision.
- Guides Treatment Plans: Helps doctors tailor interventions by understanding hemodynamics effectively.
- Accessible and Reliable: Widely available in hospitals, it’s a trusted diagnostic tool globally.
The Science Behind Colour Doppler Echocardiography
At its core, Colour Doppler echocardiography combines traditional ultrasound imaging with Doppler technology to visualize blood flow patterns. Ultrasound waves bounce off moving blood cells, and the Doppler effect measures changes in frequency due to motion. These variations are translated into colors, typically red and blue, indicating the direction and velocity of blood flow.
This visual representation is invaluable for evaluating heart structures and hemodynamic functions. For instance, turbulent or reverse blood flow, often highlighted in bright hues, may signal underlying abnormalities such as valve regurgitation or stenosis.
Why Colour Doppler Echocardiography is a Game-Changer
The advent of Colour Doppler echocardiography marked a pivotal shift in cardiac diagnostics. Here’s why it’s indispensable:
- Enhanced Diagnostic Accuracy: Combining grayscale imaging of heart structures with real-time blood flow visualization ensures comprehensive assessments.
- Early Detection of Conditions: Spotting irregularities in blood flow helps detect conditions like congenital heart defects or cardiomyopathies early.
- Guiding Interventions: By understanding the severity of issues such as valve leaks, doctors can prioritize treatments ranging from medication to surgery.
- Monitoring Progress: During follow-ups, this tool evaluates how well treatments are working, ensuring optimal care.
Key Applications in Cardiology
- Valve Analysis: Evaluate whether heart valves are opening and closing properly.
- Congenital heart defects: detect abnormal connections between heart chambers or blood vessels.
- Blood Flow Measurement: identify blockages or turbulence in vessels that might indicate narrowing or stenosis.
- Heart Failure Diagnosis: Assess the heart’s pumping efficiency and identify fluid accumulation in the lungs.
Types of Doppler Echocardiography
While Colour doppler is a popular modality, understanding its counterparts offers a holistic view:
- Pulsed Wave Doppler: Measures blood flow at a specific location.
- Continuous Wave Doppler: Captures high-velocity blood flow in cases like aortic stenosis.
- Tissue Doppler Imaging: Focuses on the movement of heart muscle tissues rather than blood flow.
Each variation complements the Colour Doppler technique, creating a versatile diagnostic toolkit.
Practical Steps for a Colour Doppler Echocardiography Exam
Preparation and procedure details are essential for both patients and professionals.
- Patient Prep: No fasting or special instructions are typically needed, making it an accessible test.
- Application of Gel: A water-based gel is applied to enhance sound wave transmission.
- Probe Placement: A transducer probe is placed on the chest or subcostal region for imaging.
- Image Analysis: Real-time data helps the cardiologist assess structural and functional aspects of the heart.
These steps underscore the non-invasive, user-friendly nature of the procedure.
Explanation of Probe Placement in Colour Doppler Echocardiography
The placement of the probe, or transducer, is a critical step in obtaining accurate and high-quality images during a Colour Doppler Echocardiography exam. Here’s a step-by-step breakdown of how this is performed, ensuring precise visualization of cardiac structures and blood flow dynamics:
Step 1: Patient Positioning
Proper patient positioning ensures comfort and optimal imaging:
- Supine Position: The patient typically lies on their back, with the head slightly elevated.
- Left Lateral Decubitus Position: In some cases, the patient may be asked to turn onto their left side. This position brings the heart closer to the chest wall, improving image clarity and alignment of the ultrasound beam.
Step 2: Application of Ultrasound Gel
- A water-based, conductive gel is applied to the skin where the probe will make contact.
- The gel eliminates air pockets that could interfere with sound wave transmission, ensuring a clear pathway between the probe and the body.
- It also enhances the sensitivity of the transducer to detect subtle blood flow and tissue movements.
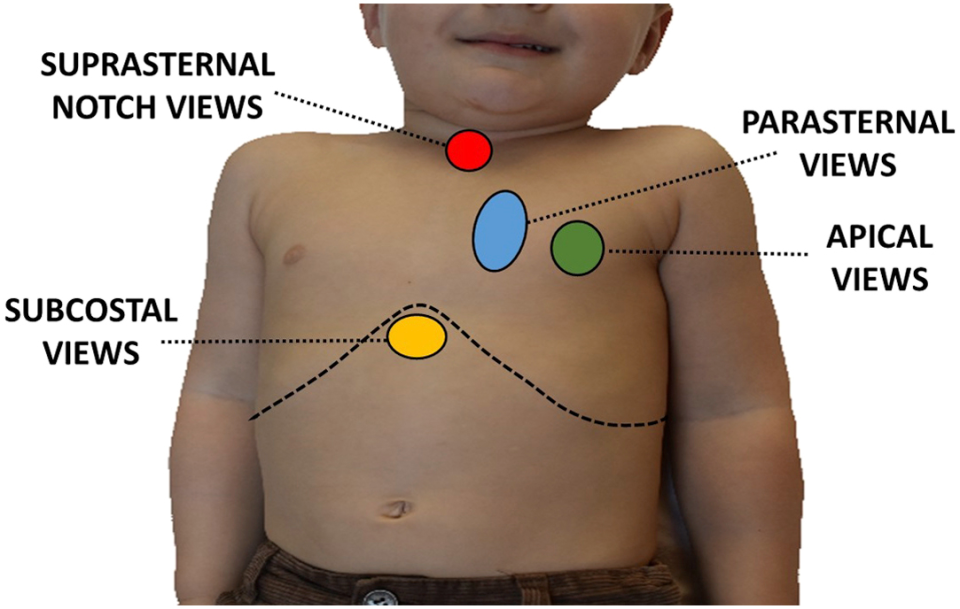
Step 3: Placement of the Transducer
The transducer, a handheld device that emits and receives ultrasound waves, is placed at specific locations on the chest or other areas to capture detailed images of the heart and blood vessels. Common probe positions include:
- Parasternal Position:
- The probe is placed on the left side of the sternum.
- This view is used to visualize the heart’s chambers, valves, and blood flow patterns from a longitudinal or cross-sectional perspective.
- Apical Position:
- The probe is positioned at the apex of the heart, typically around the left side of the chest, near the lower ribs.
- This allows imaging of the heart from below, providing critical views of the heart’s pumping action and blood flow across the valves.
- Subcostal Position (Subxiphoid):
- The probe is placed just below the sternum and angled upward.
- This position is particularly useful for patients who may have difficulty lying flat or when other views are obscured.
- Suprasternal Position:
- The transducer is placed above the sternum, at the base of the neck.
- This view helps assess blood flow in large vessels such as the aorta.
- Other Views:
- Depending on the clinical need, additional placements like the right parasternal area or even transesophageal approaches (requiring a specialized probe inserted into the esophagus) might be used.
Step 4: Adjusting Probe Angles and Pressure
The technician or cardiologist manipulates the probe to capture the best possible images:
- Angle Adjustment: Changing the angle helps align the ultrasound beam with the direction of blood flow or the structure being examined. This is crucial for accurate Doppler measurements.
- Varying Pressure: Gentle pressure may be applied to improve contact, especially in areas with less soft tissue, such as over the sternum. Excessive pressure is avoided to prevent discomfort.
Step 5: Real-Time Feedback and Optimization
- The transducer collects real-time data, displaying it on the echocardiography monitor.
- The operator evaluates the quality of the images, adjusting the probe position, angle, or depth settings as needed.
- Color overlays (red and blue) indicate the direction and velocity of blood flow, allowing for immediate assessment of abnormalities.
Considerations for Special Populations
- Children and Infants: Smaller probes are used, and positioning may be adapted to ensure comfort and cooperation.
- Critically Ill Patients: In ICU settings, positioning may be limited, and suboptimal views may require additional techniques, such as transesophageal echocardiography.
Addressing Misconceptions
Despite its effectiveness, Colour Doppler echocardiography is often misunderstood. Here are common myths debunked:
- “It’s Invasive.” This technique is completely non-invasive and painless.
- “It’s Only for Severe Cases.” Early detection is one of its greatest strengths, suitable for all risk levels.
- “It Replaces Other Tests.” While powerful, it complements other diagnostic tools like ECGs or MRIs.
- “The Colors Represent Disease Severity.” Colors indicate direction and velocity, not directly the severity of a condition.
Key Takeaways Recap
- Revolutionary Imaging: A breakthrough in visualizing real-time blood flow.
- Non-invasive: A safe, painless diagnostic tool for all.
- Accurate Diagnostics: Pinpoints various heart issues with precision.
- Supports Treatment: Informs better clinical decisions.
- Accessible Technology: Widely available in most healthcare facilities.
Conclusion: Unlocking Better Heart Health with Colour Doppler
Mastering the basics of Colour Doppler echocardiography equips us to appreciate the marvel of modern medicine. By offering detailed, real-time insights into blood flow and cardiac functions, this technique has revolutionized heart health diagnostics. Whether used for early detection, treatment planning, or monitoring, its value is undeniable.
Ready to explore the benefits of Colour Doppler echocardiography? Consult your healthcare provider or visit a trusted cardiology center to learn more. For readers eager to dive deeper into cardiac care, browse our related articles and resources for a heart-smart journey!
FAQs About Basics of Colour Doppler Echocardiography
1. Is Colour Doppler echocardiography safe?
Absolutely. It uses sound waves, not radiation, making it risk-free and suitable for all ages.
2. How long does the procedure take?
Typically, 30–60 minutes, depending on the complexity of the case.
3. Can it detect heart attacks?
While it assesses heart function, diagnosing a heart attack may require complementary tests like ECG or troponin levels.
4. Is it covered by insurance?
Most health insurance plans cover it as a standard diagnostic procedure for heart conditions.
5. How often should it be done?
Frequency depends on your doctor’s advice, usually based on symptoms or follow-up needs.

